Introduction
Why Refinish Your Kitchen Table?
Your kitchen table is the heart of your home. It’s where you gather for meals, work on projects, and spend quality time with loved ones. However, over time, it can get scratched and worn out. Refinishing your kitchen table not only restores its beauty but also extends its life, making it an enjoyable place for family and friends for years to come.
Benefits of No Sanding Refinishing
You might think that refinishing a table requires a lot of effort, especially sanding it down to bare wood. But the good news is, you can refinish your scratched kitchen table without sanding! This method saves you time and effort while still delivering fantastic results. It’s perfect for minor scratches and imperfections, allowing you to refresh your table in just about three hours.
What You’ll Need for This Project
Before diving in, let’s gather everything you’ll need for this project. You’ll be pleasantly surprised at how simple it is!
Gather Your Supplies
Essential Tools for Refinishing
Clean cloths
Foam brush or lint-free cloth
Putty knife (for wax fillers)
Gloves (to protect your hands)
Soft cloth for buffing
Recommended Products for Scratch Repair
Wax fillers: Great for filling minor scratches.
Wood stain: Ideal for deeper scratches; choose a color that matches your table.
Furniture repair markers: Perfect for quick fixes and color touch-ups.
Optional Supplies for a Professional Touch
Clear protective finish: This adds an extra layer of protection.
Polishing cloth: For that shiny, sleek finish.
Preparing Your Workspace
Choosing the Right Location
Set up your workspace in a well-ventilated area. This could be your kitchen, garage, or even outside if the weather is nice. Make sure it’s a place where you won’t be disturbed.
Protecting Your Surroundings
Cover the surrounding areas with old newspapers or a drop cloth. This will save you from any accidental spills or drips.
Safety Precautions
Always wear gloves when handling chemicals or stains to protect your skin. If you’re sensitive to fumes, consider wearing a mask.
Assessing the Damage
Identifying Types of Scratches
Look closely at your table to determine the depth and extent of the scratches. Are they surface-level, or do they go deeper? Knowing this will help you choose the best method for repair.
Determining the Best Repair Method
Minor scratches: Wax fillers or furniture markers work great.
Deeper scratches: Wood stain will help blend the damaged area with the surrounding wood.
Planning Your Refinishing Approach
Once you assess the damage and determine the repair method, create a simple plan. Decide on the order of tasks, from cleaning to applying the finish.
Cleaning the Table
Best Cleaning Solutions for Wood
Before refinishing, clean your table thoroughly. Use a mixture of mild soap and water or a wood-safe cleaner. Avoid harsh chemicals as they can damage the wood.
Proper Cleaning Techniques
Dampen your cloth with the cleaning solution.
Wipe the entire surface of the table, removing any dirt or grime.
Rinse the cloth frequently to avoid spreading dirt.
Drying Your Table Thoroughly
After cleaning, let your table dry completely. This is crucial for the next steps, as moisture can interfere with the refinishing process.
Choosing a Repair Method
Using Wax Fillers for Minor Scratches
If your table has minor scratches, a wax filler is your best friend. Simply press the wax into the scratch with a putty knife, then wipe away any excess.
Applying Wood Stain for Deeper Scratches
For deeper scratches, apply wood stain using a foam brush. Make sure to blend the stain into the surrounding area for a seamless look.
Utilizing Furniture Repair Markers
Furniture repair markers are great for quick fixes. Just color in the scratch, and it will blend with the wood.
Refinishing Techniques
How to Apply a New Finish without Sanding
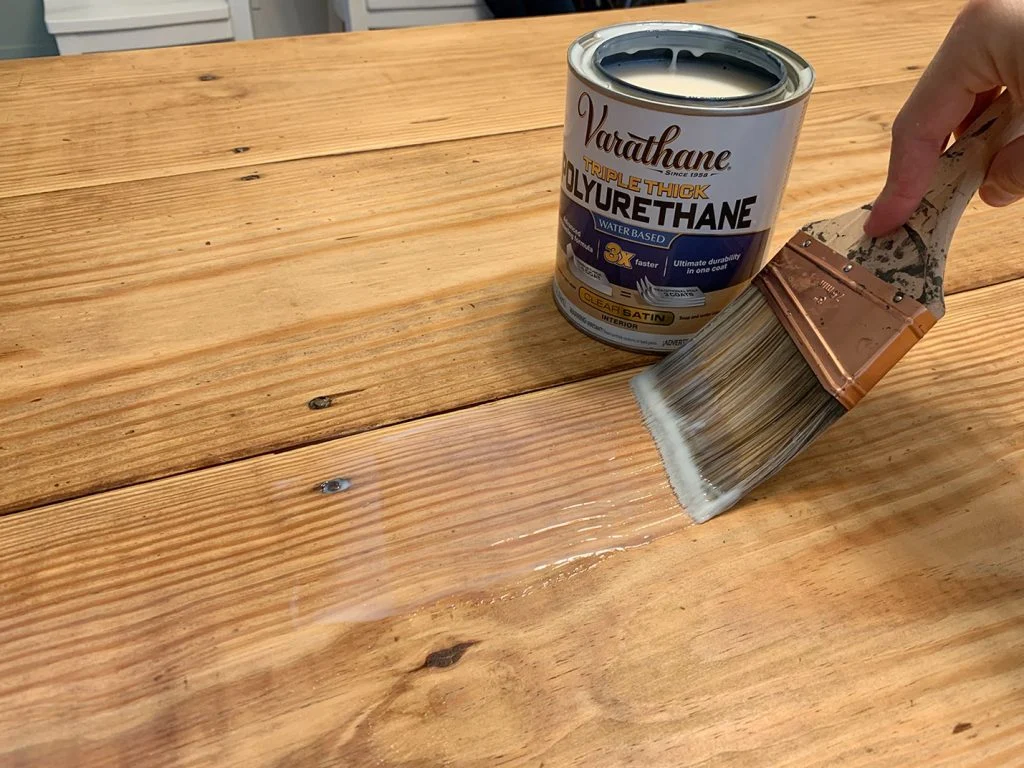
After repair, you’ll want to apply a new finish. Use a foam brush or lint-free cloth to apply a thin layer of clear finish.
Blending Colors for a Seamless Look
If you’re using stain or markers, ensure that you blend the colors well. This will help your refinished spots match the rest of your table perfectly.
Using a Foam Brush vs. Cloth
Foam brushes are ideal for applying finishes smoothly. If you prefer using a cloth, make sure it’s lint-free to avoid leaving fibers behind.
Applying the Finish
Step-by-Step Application Process
1. Start at one end of the table and work your way to the other.
2. Apply the finish in long, even strokes.
3. Keep a wet edge to avoid streaks.
Tips for Even Coverage
Don’t overload your brush or cloth.
Apply the finish in thin layers and allow each layer to dry before adding another.
How to Spot Clean Mistakes
If you notice any drips or uneven spots, gently wipe them with a clean cloth before they dry.
Final Touches
Buffing the Surface for Shine
Once the finish is completely dry, take a soft cloth and buff the surface. This will give your table a beautiful shine.
Adding Protective Coating
For added protection, consider applying a clear coat after the finish has dried. This will shield your table from future scratches and spills.
Curing Time for Best Results
Let your table cure for at least 24 hours before using it. This allows the finish to harden and provides the best protection.
Conclusion
Recap of Key Steps
Refinishing your kitchen table without sanding can be a straightforward and rewarding process. Just remember to clean, assess the damage, choose the right repair method, and apply your finish carefully.
Encouragement to Try DIY Refinishing
Don’t be afraid to take on this DIY project! It’s a great way to restore your table and enhance your home.
Final Thoughts on Table Maintenance
Regular maintenance is key to keeping your kitchen table looking its best. Consider doing small touch-ups as needed to keep it in top shape.
Key Takeaways
Quick Tips for Future Maintenance
Wipe spills immediately to prevent damage.
Use coasters to protect the surface from heat and moisture.
Regularly dust and clean to avoid build-up.
Importance of Regular Care
Regularly maintaining your kitchen table will keep it looking beautiful and extend its lifespan.
DIY Refinishing Resources
For more tips and tricks, look for online videos and tutorials that can guide you through specific techniques.
Frequently Asked Questions (FAQ)
How long does the refinishing process take?
You can complete the refinishing process in about three hours, but allow for additional curing time.
What if my scratches are too deep to repair?
If scratches are too deep, consider consulting a professional or using a more robust refinishing method.
Can I use this method on other wooden furniture?
Yes! This no-sanding method works well on various wooden furniture, including chairs, cabinets, and dressers.
How often should I refinish my kitchen table?
Refinishing every few years or whenever you notice significant wear is a good rule of thumb.
By following these steps, you can breathe new life into your scratched kitchen table without the need for sanding. Enjoy your beautifully refinished table and the compliments that come with it!